Battery switch on travel trailer function is crucial for managing your RV’s power. Understanding how these switches work – whether single-pole, double-pole, or double-pole double-throw – is key to safe and efficient power usage. This guide breaks down the types, connection procedures, troubleshooting, and maintenance, empowering you to confidently handle your travel trailer’s electrical system. We’ll explore everything from safely connecting your batteries to diagnosing common problems and extending battery life.
We’ll cover the different types of battery switches, how to safely connect and disconnect batteries, troubleshoot common issues, perform routine maintenance, and even understand how the battery switch interacts with other parts of your RV’s power system, like solar panels and inverters. Get ready to become a travel trailer electrical expert!
Battery Switch Types in Travel Trailers: Battery Switch On Travel Trailer Function
Choosing the right battery switch for your travel trailer is crucial for managing power efficiently and safely. Different switches offer varying levels of control and protection, impacting both convenience and the lifespan of your batteries. Understanding these differences will help you make an informed decision.
So, you’re an audiophile who loves to travel? Awesome! Planning your next trip? Check out this guide on audiophile travel setups for tips on keeping your listening experience top-notch on the go. It covers everything from portable DACs to noise-cancelling headphones. But if you’re more into nature soundscapes, then audiophile travel aetup offers a different perspective, focusing on how to enhance your appreciation of natural sounds while traveling.
Either way, you’ll find great advice to help you enjoy your music wherever you go!
Single-Pole Battery Switches
A single-pole battery switch is the simplest type. It’s essentially a single switch that connects or disconnects a single battery from the trailer’s electrical system. Internally, it’s a basic on/off mechanism, often a simple toggle or rocker switch. Power flows directly through the switch when it’s “on,” and is completely interrupted when it’s “off.” The advantage is its low cost and simplicity; however, it only allows for control over one battery at a time, limiting its functionality for trailers with multiple battery banks.
Circuit protection is usually handled separately, requiring a fuse or circuit breaker in the wiring.
Double-Pole Battery Switches
Double-pole switches offer more control. They manage two separate circuits, typically for two different batteries. Imagine two separate single-pole switches housed within one unit. Each pole controls a separate battery, enabling independent connection or disconnection. This is useful for isolating batteries, preventing discharge from one affecting the other.
This increased control is balanced against a slightly higher cost and more complex wiring. Again, circuit protection is typically handled separately.
Double-Pole Double-Throw (DPDT) Battery Switches
DPDT switches provide the most advanced control. They can connect either one battery or both batteries to the trailer’s electrical system, or disconnect both entirely. Internally, a DPDT switch uses a more complex arrangement of contacts to manage this three-way functionality. The “throw” refers to the ability to switch between multiple positions. This type allows for the use of both batteries simultaneously (for increased power demands) or individually (for charging or extending battery life).
This level of control comes at the highest cost and requires the most complex wiring. While offering superior functionality, the increased complexity can make installation and troubleshooting more challenging.
Comparison of Battery Switch Types
| Switch Type | Number of Batteries Controlled | Circuit Protection | Typical Applications |
|---|---|---|---|
| Single-Pole | 1 | Separate fuse or circuit breaker | Small trailers with a single battery |
| Double-Pole | 2 | Separate fuse or circuit breaker per battery | Trailers with two separate battery banks (e.g., house and starting batteries) |
| Double-Pole Double-Throw (DPDT) | 2 | Separate fuse or circuit breaker per battery | Trailers requiring high power demands or selective battery usage |
Connecting and Disconnecting Batteries
Connecting and disconnecting your travel trailer batteries safely is crucial for preventing damage to your electrical system and avoiding personal injury. A battery switch provides a convenient and safe way to manage this process, but proper technique is essential. This section details the correct procedure and highlights important safety measures.Properly connecting and disconnecting your travel trailer batteries using a battery switch involves a methodical approach that prioritizes safety.
Neglecting these steps can lead to dangerous situations, including electrical shocks, short circuits, and even battery explosions. Always remember to prioritize safety above all else when working with batteries.
Planning a trip and don’t want to compromise on your audio quality? You need to read up on audiophile travel aetup – it’s packed with practical advice for keeping your tunes pristine wherever you go. This guide, unlike others, really focuses on the practical side of things. After reading that, maybe explore this other site with audiophile travel aetup advice to find some different perspectives on gear and strategies.
Happy listening!
Safe Battery Connection Procedure
Before you begin, ensure the battery switch is in the “OFF” position. Locate your battery terminals; they are typically clearly marked with “+” (positive) and “-” (negative). Using the correct size wrench, carefully loosen the terminal nuts on both the positive (+) and negative (-) terminals. Connect the positive cable to the positive terminal first, ensuring a secure connection.
Then, connect the negative cable to the negative terminal. Tighten all nuts firmly to prevent loose connections. Finally, turn the battery switch to the “ON” position.
Safe Battery Disconnection Procedure
To disconnect the batteries, reverse the connection process. First, turn the battery switch to the “OFF” position. This will break the circuit, minimizing the risk of sparks. Then, carefully loosen and remove the negative cable from the negative terminal first. Following this, remove the positive cable from the positive terminal.
Tighten the terminal nuts on both terminals to prevent corrosion. Always disconnect the negative terminal last and connect it first.
So, you’re an audiophile who travels? Awesome! Check out this guide on audiophile travel setups for tips on keeping your sound quality high on the go. It covers packing, portable gear, and even noise cancellation. Then, if you’re into nature, consider this other great resource: audiophile travel aetup which focuses on enjoying your music in outdoor settings.
Both are essential reads for any audiophile on the move!
Safety Precautions, Battery switch on travel trailer function
Working with batteries requires careful attention to safety. Always wear safety glasses to protect your eyes from potential splashes of battery acid. Never wear loose clothing or jewelry that could accidentally come into contact with the terminals. Have a fire extinguisher nearby in case of an emergency, although fires are unlikely if proper procedures are followed. If you are unsure about any step, consult a qualified technician.
Grounding and Cable Management
Proper grounding is vital for preventing electrical shocks and ensuring the safe operation of your electrical system. The negative battery cable should be securely connected to a clean, grounded point in your trailer’s chassis. Keep cables neatly organized and secured to prevent accidental contact or damage. Avoid running cables near sharp edges or hot surfaces. Use cable ties or clamps to keep the wiring tidy and away from moving parts.
Common Mistakes to Avoid
It’s important to be aware of common mistakes that can compromise safety and functionality.
- Connecting the negative cable before the positive cable.
- Disconnecting the positive cable before the negative cable.
- Failing to turn the battery switch to the “OFF” position before disconnecting.
- Using the wrong size wrench or tools, potentially damaging the terminals.
- Leaving terminal nuts loose, leading to poor connections and potential corrosion.
- Ignoring corrosion on the battery terminals.
- Failing to wear appropriate safety gear.
Troubleshooting Common Battery Switch Issues
Dealing with a faulty battery switch in your travel trailer can be frustrating, leaving you without power when you need it most. This section will guide you through identifying and resolving common problems, helping you get back on the road quickly. We’ll cover diagnosing issues like no power, intermittent power, and blown fuses, providing practical troubleshooting steps and tests you can perform yourself.
Common Battery Switch Problems and Their Causes
Several issues can arise with your travel trailer’s battery switch. No power indicates a complete break in the circuit, while intermittent power suggests a loose connection or a failing component. Blown fuses signal an overload or a short circuit somewhere in the system. These problems can stem from corroded connections, loose wires, faulty switches, or even damaged wiring within the trailer itself.
Understanding these potential causes is the first step towards effective troubleshooting.
Troubleshooting Techniques for Battery Switch Problems
Let’s tackle how to diagnose and fix these issues. A systematic approach is key. First, visually inspect the battery switch and all connections for corrosion, loose wires, or damage. Clean any corroded terminals with a wire brush and baking soda solution. Tighten any loose connections.
If you find a blown fuse, replace it with a fuse of the same rating. However, before replacing the fuse, investigatewhy* it blew to prevent further issues. A recurring blown fuse often points to a short circuit that needs attention.
Testing the Battery Switch with a Multimeter
A multimeter is an invaluable tool for testing the functionality of your battery switch. First, ensure the multimeter is set to the appropriate voltage setting (typically DC volts). With the battery switch OFF, connect the multimeter probes to the input terminals of the switch. You should read approximately 12 volts (the battery voltage). If you don’t, the problem lies before the switch, possibly in the battery or wiring leading to the switch.
Next, turn the switch ON. You should now read the same voltage at the output terminals of the switch. If you don’t, the switch itself is likely faulty. If you read voltage at the input but not at the output, the switch is the problem.
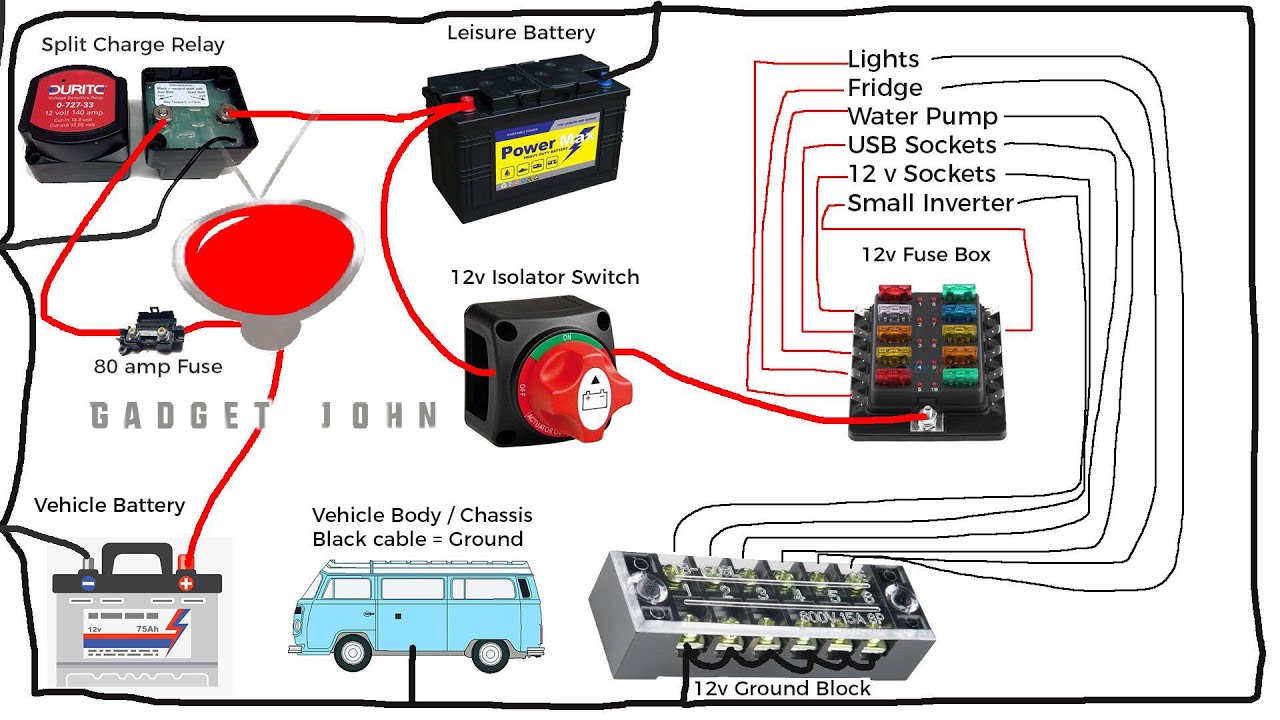
Wiring Diagram: Simple Battery Switch Configuration
Imagine a simple diagram: A battery is connected to the input terminals of a battery switch. Two wires run from the output terminals of the switch; one goes to the trailer’s 12V system and the other goes to a fuse. The fuse protects the 12V system from overloads. This is a basic configuration, and more complex systems may include additional components and protection devices.
This visual helps understand the flow of power.
Troubleshooting Flowchart
Here’s a flowchart to guide your troubleshooting:
- Symptom: No power to the trailer.
- Check 1: Battery voltage? (Use multimeter). If no voltage, check battery and connections to the battery.
- Check 2: Voltage at switch input? If no voltage, check wiring between battery and switch.
- Check 3: Voltage at switch output (switch ON)? If no voltage, replace the switch.
- Check 4: Voltage at trailer’s 12V system? If no voltage, check wiring from switch to trailer system and check the fuse.
- Check 5: Blown fuse? Replace with correct rating, then investigate the cause of the blown fuse (short circuit).
- Check 6: Intermittent power? Check all connections for tightness and corrosion.
Battery Switch Maintenance and Upkeep
Keeping your travel trailer’s battery switch in good working order is crucial for reliable power and preventing costly repairs down the line. Regular maintenance ensures your batteries are properly connected and disconnected, protecting them from damage and maximizing their lifespan. Neglecting maintenance can lead to corrosion, poor connections, and even potential fire hazards.Proper maintenance involves a combination of regular inspections, cleaning, and timely replacements when necessary.
This ensures the safe and efficient operation of your battery system, providing peace of mind on your adventures.
Preventative Maintenance Schedule
A preventative maintenance schedule should be incorporated into your overall travel trailer upkeep routine. This proactive approach helps to identify and address minor issues before they escalate into major problems. Consider these recommendations:
- Monthly Inspection: Visually inspect the battery switch for any signs of corrosion, loose connections, or damage to the switch itself. Check the terminals for any build-up of white or green powdery substance, indicating corrosion.
- Semi-Annual Cleaning: Clean the battery switch terminals and connections using a wire brush and baking soda solution (a paste of baking soda and water). This removes any corrosion build-up, ensuring a good electrical connection.
- Annual Thorough Check: Once a year, perform a more thorough inspection, including checking the tightness of all connections and the overall structural integrity of the switch. Test the switch’s functionality in all positions to ensure proper operation. If you’re not comfortable doing this yourself, consult a qualified RV technician.
Identifying Signs of Wear and Tear
Recognizing the signs of a failing battery switch is essential for preventing unexpected power outages or more serious problems. Early detection allows for timely repairs, avoiding costly damage to your batteries or other electrical components.
- Corrosion: Excessive corrosion on the terminals is a clear indicator of a problem. It can restrict current flow, leading to poor performance and potential overheating.
- Loose Connections: If the connections are loose, they can create intermittent power issues or complete failures. Tightening the connections may resolve the issue temporarily, but persistent looseness suggests a problem with the switch itself.
- Difficult Switching: A battery switch that is difficult to operate, sticks, or doesn’t switch cleanly indicates internal wear or damage. This could be due to corrosion within the switch mechanism or mechanical failure.
- Burning Smell or Discoloration: A burning smell or discoloration around the switch is a serious warning sign indicating overheating, likely due to a faulty switch or a high-resistance connection.
Battery Switch Replacement Procedure
Replacing a faulty battery switch requires careful attention to safety procedures. Improper handling can lead to electrical shock or injury.
- Disconnect the Batteries: Before starting any work, disconnect the negative (-) terminal of both batteries. This prevents accidental electrical shock.
- Remove the Old Switch: Carefully disconnect the wires from the old switch, taking note of their positions for correct reinstallation. Unscrew the switch from its mounting location.
- Install the New Switch: Mount the new switch in the same location as the old one. Ensure it’s securely fastened.
- Reconnect the Wires: Connect the wires to the new switch, ensuring they are in the same positions as they were on the old switch. Double-check your work to avoid mistakes.
- Reconnect the Batteries: Reconnect the negative (-) terminal of both batteries. Then, reconnect the positive (+) terminals.
- Test the Switch: Test the functionality of the new switch in all positions to ensure proper operation. Verify that power is correctly routed to your appliances.
Recommended Tools and Materials
Having the right tools and materials on hand makes the maintenance and replacement of your battery switch much easier and safer.
- Wire Brush: For cleaning corrosion from terminals.
- Baking Soda: To create a paste for cleaning corrosion.
- Wrench(es): Appropriate size(s) for disconnecting and connecting battery terminals and the switch itself.
- Screwdrivers: For removing and installing the switch.
- Replacement Battery Switch: Choose a switch with the correct amperage rating for your system.
- Safety Glasses: To protect your eyes from flying debris or chemical splashes.
- Gloves: To protect your hands from corrosion and potential battery acid.
Battery Switch and Power Management Systems
Your travel trailer’s battery switch is a crucial component of its overall power management system, acting as the central control for your house batteries. Understanding its interaction with other systems like solar panels, inverters, and converters is key to maximizing your RV’s power efficiency and extending the life of your batteries.The battery switch’s primary role is to isolate or connect your house batteries to the rest of the electrical system.
This control allows you to disconnect the batteries when your trailer is stored, preventing parasitic drain and preserving their charge. It also provides a way to select which power sources (shore power, generator, or solar) charge your batteries, or to use battery power directly to run your 12V appliances.
Battery Switch Interaction with Other Systems
The battery switch sits at the heart of the power system, directing power flow. When shore power is connected, the converter charges the batteries through the switch. If you’re using solar panels, the solar charge controller manages the charging process, sending power to the batteries via the switch. An inverter uses power from the batteries (controlled by the switch) to convert 12V DC to 120V AC, supplying power to your household appliances.
In essence, the switch acts as a gatekeeper, controlling the flow of energy to and from the batteries. Improper switch configuration can lead to overcharging, undercharging, or even damage to components. For example, connecting a generator directly to the batteries without the switch’s control could lead to overcharging and battery damage.
Battery Switch and Battery Lifespan
Regularly disconnecting your batteries using the switch when the trailer is not in use significantly extends their lifespan. Parasitic draws, even small ones, continuously drain the batteries over time. This constant drain reduces their capacity and ultimately shortens their operational life. Disconnecting the batteries eliminates this drain, ensuring they remain fully charged and ready for use when you’re next on the road.
Consider this scenario: A small, constantly running clock might seem insignificant, but over months of storage, it could deplete your batteries significantly, reducing their lifespan.
Impact of Different Configurations on Energy Efficiency
Different configurations of battery switches and power management systems can significantly affect energy efficiency. For example, a system with a simple on/off switch offers less control than a system incorporating a sophisticated battery management system (BMS) with features like multiple banks, charge prioritization, and load shedding. A BMS intelligently manages power flow based on available resources and demand, maximizing battery life and reducing energy waste.
A system with only a basic switch might lead to inefficient charging, possibly resulting in unnecessary power consumption and reduced battery life. In contrast, a system with a smart BMS and a well-configured battery switch can optimize charging from multiple sources and prioritize power distribution, leading to better energy efficiency.
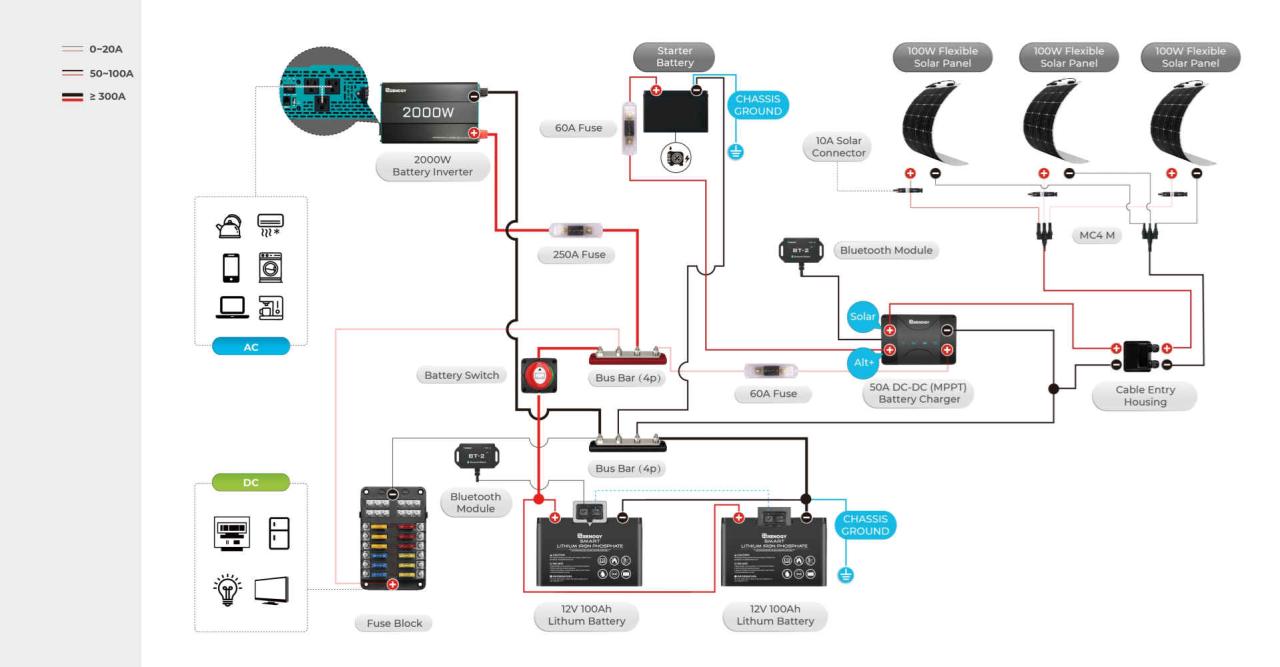
Diagram of Battery Switch Interaction with Solar Panels and Inverter
Imagine a diagram showing three main components: A bank of house batteries, a set of solar panels connected to a solar charge controller, and an inverter. The battery switch is positioned centrally. Arrows show the flow of power. Arrows from the solar charge controller go to the battery switch, then to the battery bank. Arrows from the battery bank go to the inverter, which in turn supplies power to the trailer’s AC outlets.
Another arrow shows shore power connecting to the converter, which then sends charging power through the battery switch to the batteries. This visual representation clearly illustrates how the battery switch acts as a central control point, regulating the flow of energy between the various components.
Mastering your travel trailer’s battery switch is more than just knowing how to flip a switch; it’s about understanding the heart of your RV’s power system. By following the safety precautions, troubleshooting steps, and maintenance tips Artikeld here, you’ll ensure reliable power, extend the life of your batteries, and confidently enjoy your adventures on the road. Remember, preventative maintenance is your best friend! So, get out there and explore – powered up and ready to go.
Question & Answer Hub
What happens if I leave my battery switch on all the time?
Leaving your battery switch on constantly can drain your batteries, especially if you have parasitic draws (small amounts of current used even when the RV is off). It’s best to turn it off when not using the RV for extended periods.
How often should I inspect my battery switch?
Ideally, inspect your battery switch at least once a year or before each extended trip. Look for corrosion, loose connections, and any signs of damage.
Can I use any type of battery switch in my travel trailer?
No, the correct switch depends on your setup (number of batteries, amperage). Using an incompatible switch can be dangerous and damage your system. Check your RV’s manual or consult a professional.
My battery switch is making clicking noises. What’s wrong?
Clicking noises often indicate a problem with the switch itself, possibly a faulty internal component or low battery voltage. Check your batteries and fuses first, then consider replacing the switch.
